My blog has moved!

You should be automatically redirected in 6 seconds. If not, visit
http://www.jerinknits.com
and update your bookmarks.

Saturday, November 27, 2010

avaElongated Hat - Free Knitting Pattern


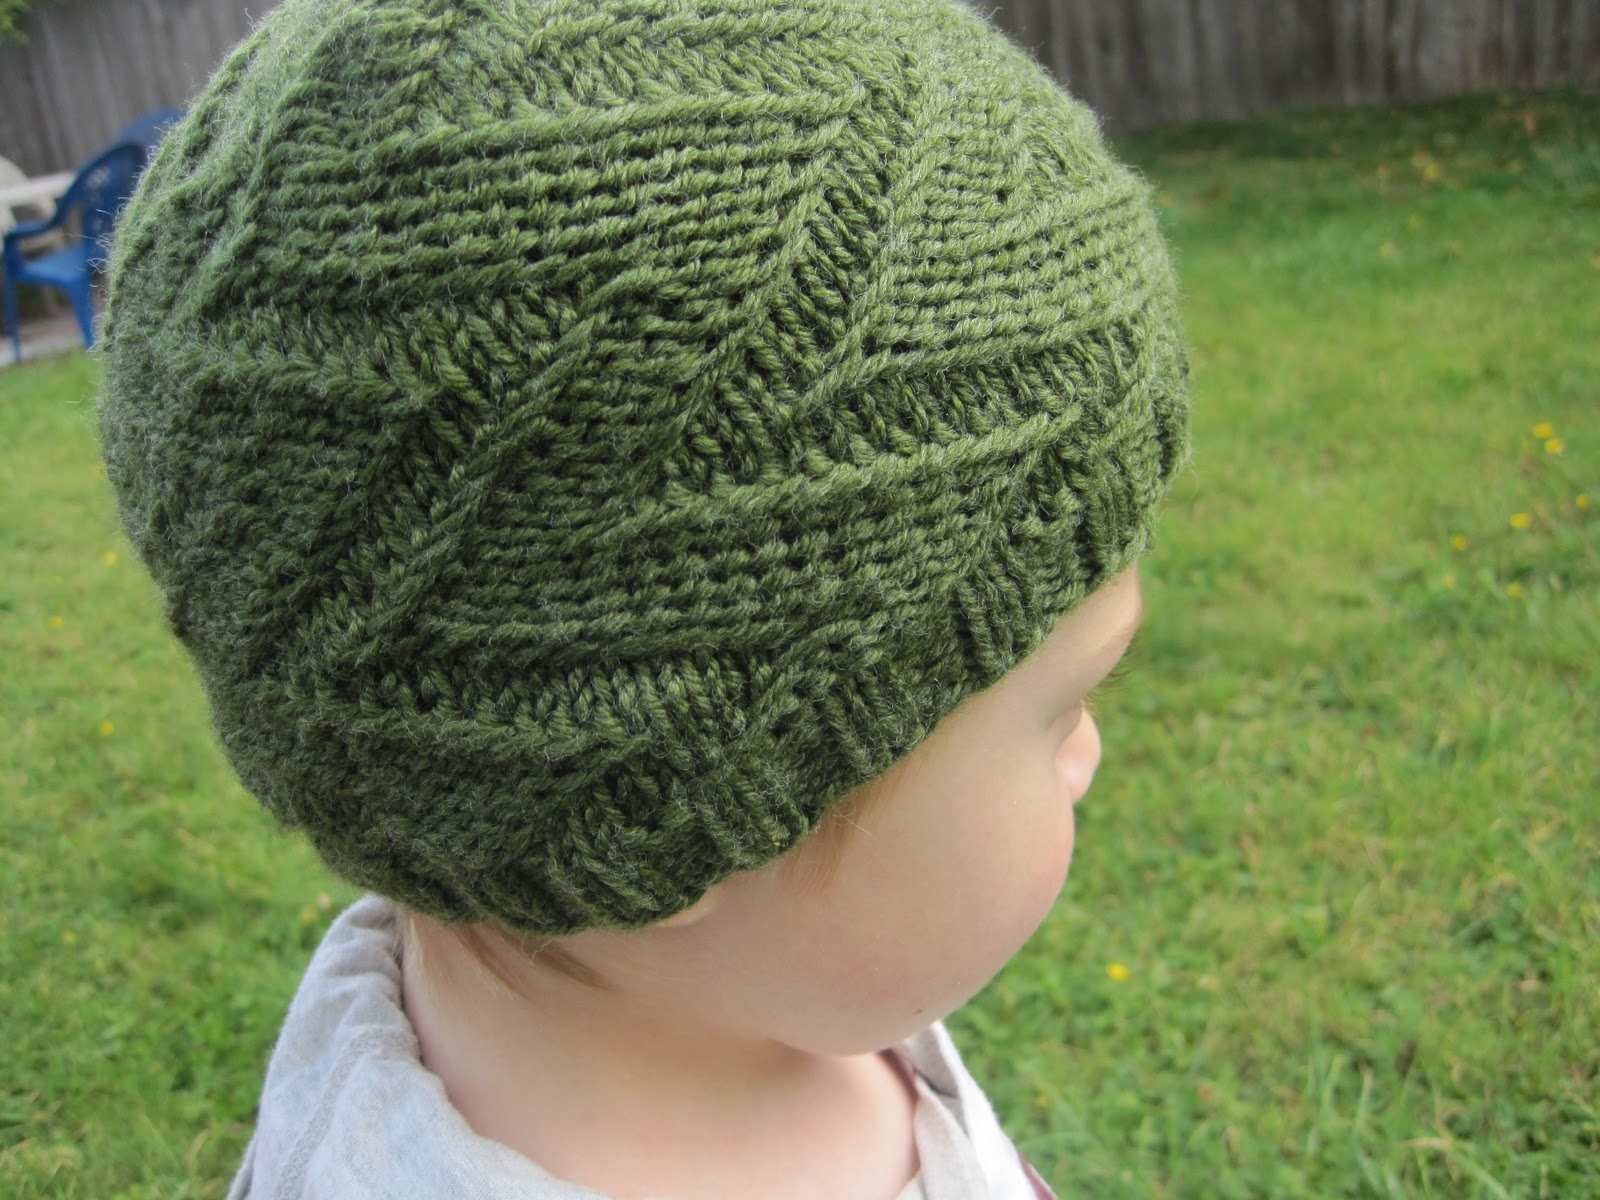
     When I created the avaElongated Scarf a few weeks ago I immediately started making plans for a companion hat. This stitch pattern is elegant and easy to work up so it is a total win. In fact, the pattern would be a perfect way for new knitter's to venture into the world of eyelet/lace patterns. The avaElongated Hat has a beautiful seed stitch brim and a slight medium slouch. I will be creating beanie and tam versions of this hat some time in the future.

      This is pattern #9 of the 14 free weekly patterns I'm posting through December.
Read more about it here.

avaElongated Hat

Yarn: Naturally Caron – Country, 1 skein
Gauge: 5sts & 7 rows per inch
Needles: Size 6 circular & size 6 double-pointed

Cast On 108 sts and join to work in the round

Row 1: *k1, p1* to end
Row 2: *p1, k1* to end

Repeat these 2 rows 2 more times (total of 6 seed stitch rows)

Eyelet Pattern:

     Row 1: *yo, k10, k2tog* to end
     Row 2 (and all even rows): K all sts
     Row 3: *k1, yo, k9, k2tog* to end
     Row 5: *k1, yo, k9, k2tog* to end
     Row 7: *k2, yo, k8, k2tog* to end
     Row 9: *k3, yo, k7, k2tog* to end
     Row 11: *k4, yo, k6, k2tog* to end
     Row 13: *k5, yo, k5, k2tog* to end
     Row 15: *k6, yo, k4, k2tog* to end
     Row 17: *k7, yo, k3, k2tog* to end
     Row 19: *k8, yo, k2, k2tog* to end
     Row 21: *k9, yo, k1, k2tog* to end
     Row 23: *k10, yo, k2tog* to end
     Row 25: *ssk, k10, yo* to end
     Row 27: *ssk, k9, yo, k1* to end
     Row 29: *ssk, k8, yo, k2* to end
     Row 31: *ssk, k7, yo, k3* to end
     Row 33: *ssk, k6, yo, k4* to end
     Row 35: *ssk, k5, yo, k5* to end
     Row 37: *ssk, k4, yo, k6* to end
     Row 39: *ssk, k3, yo, k7* to end
     Row 41: *ssk, k2, yo, k8* to end
     Row 43: *ssk, k1, yo, k9* to end
     Row 45: *ssk, yo, k10* to end

Decrease:
    
      Row 1: *k10, k2tog* to end
      Row 2: *yo, k10, k2tog* to end
      Row 3:  k all sts
      Row 4:  *k1, yo, k9, k2tog* to end
      Row 5:  *k9, k2tog* to end
      Row 6:  *k2, yo, k6, k2tog* to end
      Row 7:   k all sts
      Row 8:  *k3, yo, k5, k2tog* to end
      Row 9:  *k8, k2tog* to end
      Row 10:  *k4, yo, k3, k2tog* to end
      Row 11:  *k7, k2tog* to end
      Row 12:  *k5, yo, k1, k2tog* to end
      Row 13:  *k2, k2tog* to end
      Row 14:  k all sts
      Row 15:  *k1, k2tog* to end
      Row 16:  k all sts
      Row 17: *k2tog* to end
      Row 18:  *k2tog* to end  

Cut yarn, weave through live stitches and pull to close. Weave in ends. 

Thursday, November 25, 2010

I have been defeated...

by turkey, sweet potatoes and all the usual Thanksgiving treats! I thought, for some crazy reason, that I would be able to finish this week's pattern and get it up while also cooking dinner with my mom. I was completely wrong. Dinner went off without a hitch but the pattern got neglected. Sorry all! I am going to finish up the pattern tonight, though. It should be up by tomorrow afternoon at the latest. It's still 'this week' so I have decided to cut myself some slack on this one. ;)

Happy Thanksgiving and good luck to those of you braving the crowds on black friday!

Thursday, November 18, 2010

elleKat Legwarmers - Free Knitting Pattern

     
     This is my first legwarmer knitting experience and I'm kind of shocked that I haven't been doing this for years! They are easy to make and a super fun alternative to some of the typically gifted knitted projects (hats, scarves, etc). I decided to include sizes up to 20" circumference because I have some hefty calves and it is not often that I see things sized for people like me. ;) 
     
     My beautiful daughter Elle was the model (and inspiration) for these legwarmers so I thought it was only fitting to name this pattern for her. I plan to make these again for myself some time soon -- mother daughter legwarmers? I say "Win!" Between you and me, I have a secret desire to make a hat with this same stitch pattern just so I can name it the 'elleKat Hat'. hehe 

Hope you all enjoy this pattern. Over 1/2 way done with the 14 weeks of free patterns now. Whoa! 


This is pattern #8 of the 14 free weekly patterns I'm posting through December.
Read more about it here.


elleKat Legwarmers

Gauge: 5sts/inch in moss stitch
Yarn: Cascade Yarns Rustic
Needles: Size 7 double-pointed needles , or size needed to obtain gauge

Circumferences: 6” (8”, 10”, 12”, 14”, 16”, 18”, 20”)
             When choosing a size measure (or guesstimate) the calf size of the recipient and pick the circumference closest to that number.  The ribbing is done 1-2 inches smaller than the main circumference to make sure they stay up.

Cast On: 28 (36, 44, 52, 64, 72, 84, 92)

                Work 6 rows in 2x2 rib (k2, p2 repeating)
                Inc row – In 2x2 rib, increase with kfb 2 (4, 6, 8, 6, 8, 6, 8) times, evenly spaced.
                
             Moss Stitch Spiral:

 Row 1:  *p3, [k1, p1] 3 times, k1* to end
     Row 2:  Repeat Row 1
     Row 3:  *k1, p3, [k1, p1] 3 times* to end
     Row 4:  Repeat Row 3
     Row 5:  *p1, k1, p3, [k1, p1] twice, k1* to end
     Row 6:  Repeat Row 5
     Row 7: *k1, p1, k1, p3, [k1, p1] twice* to end
     Row 8:  Repeat row 7
     Row 9: *[p1, k1] twice, p3, k1, p1, k1* to end
     Row 10: Repeat Row 9
     Row 11: *k1, [p1, k1] twice, p3, k1, p1* to end
     Row 12: Repeat Row 11
     Row 13: *[p1, k1] 3 times, p3, k1* to end
     Row 14: Repeat Row 13
     Row 15: *k1, [p1, k1] 3 times, p3* to end
     Row 16: Repeat Row 15
     Row 17:  *p1, k1, [p1, k1] 3 times, p2* to end
     Row 18: Repeat Row 17
     Row 19: *p2, k1, [p1, k1] 3 times, p1* to end
     Row 20: Repeat Row 19

Repeat Rows 1-20 until legwarmers are desired length

Dec – In 2x2 rib, decrease with k2tog  2 (4, 6, 8, 6, 8, 6, 8) times, evenly spaced
     Work 4 rows 2x2 rib

Bind off in rib pattern. I used the basic bind off that can be seen here, because it is a little tighter than the cast on edge and brings in the legwarmers around the ankle. J

Thursday, November 11, 2010

bootJute Doormat - Free Knitting Pattern


    I decided to be completely crazy this week and try knitting up a doormat out of garden twine. It turned out much better than I expected. I am really happy with the result and I think it will make a great gift, especially for those people that don't wear hats or scarves. While I was breaking rules I also decided to try painting the finished product. It was so much fun. I felt a little like a kid with his hand in the candy jar. It went against all my instincts but since I was using twine I had to go for it.

    Pattern note - This turned out a little smaller than is ideal. I used  832 ft of twine but when I do it again I will use 1248 ft so that it is a bit longer.


 This is pattern #7 of the 14 free weekly patterns I'm posting through December.
Read more about it here.


bootJute


Yarn?: twisted jute garden twine, 4lb load limit
Needle: Size 15 straight or circular (worked back & forth)
Gauge: 2 sts & 3 rows per inch. (2 strands held together)

Cast-On 32 sts

     Row 1-4: knit
  
     Diamond Pattern:
        
           Row 1: k3, [p1, k11, p1] twice, k3
           Row 2: k3, [k2, p9, k2] twice, k3
           Row 3: k3, [k1, p2, k7, p2, k1] twice, k3
           Row 4: k3, [p2, k2, p5, k2, p2] twice, k3
           Row 5: k3, [k3, p2, k3, p2, k3] twice, k3
           Row 6: k3, [p4, k2, p1, k2, p4] twice, k3
           Row 7: k3, [k5, p3, k5] twice, k3
           Row 8: k3, [p6, k1, p6] twice, k3        
           Row 9: repeat row 7
           Row 10: repeat row 6
           Row 11: repeat row 5
           Row 12: repeat row 4
           Row 13: repeat row 3
           Row 14: repeat row 2
        
          Repeat these 14 rows until desired length.
     
     Work 4 rows in garter st.
     Bind off & weave in ends. 

After I finished knitting this up I painted it and then sprayed it with a clear glaze so that it stands up to people walking on it. It also took some reshaping to get it to lay right but it's perfect after I reshaped and put the clear coat on.  Here are some pics of the painting process. 


Friday, November 5, 2010

flabbergasted! & giveaways

     I just wanted to write a quick post to thank you all for the positive feedback. It has been great to hear that you've been enjoying my patterns. I started this blog (and the free pattern series) in the hopes that this would happen but I am completely shocked, flabbergasted, dumbfounded and humbled. :) I never thought I would see my patterns worked up by other people. It is so fantastic!

     I hope that you all enjoy the rest of this free pattern series. In addition to that series continuing through December, I am going to be adding some posts about my favorite knitting accessories, yarns, and tools. I'm also working on a giveaway (or two) that I will be posting details about next week, so watch for that.

     Oh! One last thing. I finally created a twitter account. Follow me for sneak peeks of upcoming patterns, knitting tips and other randomness. ;)  

Thursday, November 4, 2010

avaElongated Free Scarf Pattern


     The idea for this pattern has been gnawing at me ever since I finished the Ava Lynne Baby Hat. The Ava Lynne eyelet pattern is easy to knit but it still creates a great deal of visual interest so I knew that I was going to use it again. I took the same basic eyelet pattern from Ava Lynne and extended it (both in width & length) to create a more elegant stitch pattern. This scarf has a beautiful subtle wave along the edges. I am really happy with it and I hope you all enjoy it.


     This pattern is #6 of the 14 free weekly patterns that I will be posting on this blog. 

Check out this post to learn more.


avaElongated

Yarn: Naturally Caron - Country (shown in deep taupe) - 2-3 skeins depending on desired length
Gauge: 5sts & 7 rows per inch
Needles: Size 6 straight (or circular worked back & forth)

Cast On 46 sts

Row 1: *k1, p1* to end
Row 2: *p1, k1* to end

Repeat these 2 rows 2 more times (total of 6 seed stitch rows)

Keep working 1st & last 5sts of every row in seed stitch. knit the purls & purl the knits.. ;)

Eyelet Pattern:

     Row 1: [yo, k10, k2tog] 3 times
     Row 2 (and all even rows): p all sts
     Row 3: [k1, yo, k9, k2tog] 3 times
     Row 5: [k1, yo, k9, k2tog] 3 times
     Row 7: [k2, yo, k8, k2tog] 3 times
     Row 9: [k3, yo, k7, k2tog] 3 times
     Row 11: [k4, yo, k6, k2tog] 3 times
     Row 13: [k5, yo, k5, k2tog] 3 times
     Row 15: [k6, yo, k4, k2tog] 3 times
     Row 17: [k7, yo, k3, k2tog] 3 times
     Row 19: [k8, yo, k2, k2tog] 3 times
     Row 21: [k9, yo, k1, k2tog] 3 times
     Row 23: [k10, yo, k2tog] 3 times
     Row 25: [ssk, k10, yo] 3 times
     Row 27: [ssk, k9, yo, k1] 3 times
     Row 29: [ssk, k8, yo, k2] 3 times
     Row 31: [ssk, k7, yo, k3] 3 times
     Row 33: [ssk, k6, yo, k4] 3 times
     Row 35: [ssk, k5, yo, k5] 3 times
     Row 37: [ssk, k4, yo, k6] 3 times
     Row 39: [ssk, k3, yo, k7] 3 times
     Row 41: [ssk, k2, yo, k8] 3 times
     Row 43: [ssk, k1, yo, k9] 3 times
     Row 45: [ssk, yo, k10] 3 times
     Row 46: purl all sts

Repeat until scarf is desired length or until you are nearing the end of your yarn.
Work 6 rows in seed stitch.
Bind off all stitches & weave in ends.

Thursday, October 28, 2010

twistedBurl Slouchy Hat - Free Pattern

    
       This week's creation was totally one of necessity. I have been struggling through this fall season with only one hat and I had reached my breaking point. I know, I know. I'm supposed to be creating patterns *and* getting holiday gifts done (two birds, one stone & all that) but I just couldn't take it any more. And I am so glad that I used my own desperation as inspiration because this hat turned out great! I wanted a slouchy simple hat that is easy to wear and twistedBurl fits the bill perfectly.

       The slouch on this hat is pretty mild because I don't think I'm quite cool enough to pull off the full slouchy hat. So if you want an extreme slouch you'll need to add more rows before you start the decreases -- I'd recommend one extra loop through the pattern rows 1-10. Oh! One more pattern note, I intentionally worked this pattern on needles that are a little big for the yarn so that the fabric created would be a little floppy. So if you want a chunkier hat then use a bulkier yarn on the same size needles. ;)


This pattern is #5 of the 14 free weekly patterns that I will be posting here on this blog. Check out this post to learn more.


twistedBurl 
  
Yarn: Lion Brand – Nature’s Choice Organic Cotton
Needles: Size 10 circular (16” or 24”), Size 10 dpns  (or needed to obtain gauge)
Gauge: 3.5 sts & 4 rows per inch in Stockinette Stitch

p3tog: purl next 3 sts together
k2tog: knit next 2 sts together
ssk: sl1 knit-wise, sl1 knit-wise, slip these 2 sts back to left needle & knit together through back loop.
     
   <the following twists are easily done without a cable needle by using this method>
RT: slip st to cable needle & hold in back of work,
       k off left needle, k st off cable needle.   
LT: slip st to cable needle & hold in front of work,
       k st off left needle, k  off cable needle.

Cast on 65 sts

    Work 6 rows in 3x2 rib (k3, p2 to end)

    Increase row:  k9, m1* to 2 sts from end, k2
    Set-up row: *p2, k6, p2, k2* to end.

Work Pattern:

                Row 1: *p2, RT, k2, LT, p2, k2* to end
                Row 2: *p2, k2, RT, k2, p2, RT* to end
                Row 3: *p2, k6, p2, k2* to end
                Row 4: * p2, k1, RT, LT, k1, p2, k2* to end
                Row 5: *p2, k6, p2, RT* to end
                Row 6: *p2, RT, k2, LT, p2, k2* to end
                Row 7: *p2, k2, LT, k2, p2, k2* to end
                Row 8: *p2, k6, p2, k2* to end
                Row 9: *p2, k1, RT, LT, k1, p2, k2* to end
                Row 10: *p2, k6, p2, k2* to end

                Repeat rows 1-10
                Work rows 1-4 again

Decrease:
       <switch to dpns when needed>
                Row 1: *p2, k6, p2, k2tog* to end   (66 sts)
                Row 2: *p2, RT,k2, LT, p2, k1* to end
                Row 3: p2, *k2, LT, k2, p1, p3tog, p1* to end,
                       the last *p3tog & p1* will use the first two   stitches of the next row. ( 54 sts)
                Row 4: *k6, p3* to end
                Row 5: *k1, RT, LT, k1, p3* to end
                Row 6: *k6, p3* to end
                Row 7: *RT, k2, LT, p3tog* to end  (42 sts)
                Row 8: *k2, RT, k2, p1* to end
                Row 9: *k6, p1* to end
                Row 10: *k1, RT, LT, k1, p1* to end
                Row 11: *k2, k2tog, k2, p1* to end  (36 sts)
                Row 12: *RT, k1, LT, p1* to end
                Row 13: *k5, p1* to end
                Row 14: *k2tog, k1, ssk, p1* to end  (24 sts)
                Row 15: *k3tog, p1* to  end (12 sts)

      Cut yarn, thread through live sts and pull to close. Weave in ends. Enjoy!

Thursday, October 21, 2010

trunKate Wrist Warmers - Free Pattern

      
This week's pattern gave me some trouble. I ended up reworking it in several different yarns before I found the perfect fit with Vanna's Choice, in Barley. I am beyond happy with the finished product though. The are a super fast knit (I finished one in about 2 hours) and I think they would make a beautiful present. In fact, I originally planned on giving these away but I fell in love with them so into the 'hat basket' they go. Hope you enjoy them as much as I do! 

I noticed today that there is a striking resemblance between the trunKate stitch pattern & the Ava Lynne stitch pattern. What can I say? I guess I love me some serpentine eyelets. *shrug* ;) 


This pattern is #4 of the 14 weeks of Free Patterns! 10 to go! 


trunKate Wrist Warmers


Yarn:  Vanna’s Choice - Barley
Needle: size 7 dpns
Gauge:  5sts/inch in St st

K2tog: knit next 2 sts together
p2tog: purl next 2 sts together
p2tbl: purl next 2 sts through back loop
ssk: sl1 knit-wise, sl1 knit-wise, slip these 2 sts back to left needle & knit together through back loop.
C3F: sl3 to cable needle, hold in front, k3, k3 from cable needle
C3B: sl3 to cable needle, hold in back, k3, k3 from cable needle

Cast-on 32 sts

R1: purl
R2: knit
R3: purl
R4: knit
R5: purl
R6: k1, [k2tog, k5, yo, k1] 3 times, k7

R7: p1, [k2tog, k4, yo, k2] 3 times, p1, k6
R8: k1, [k2tog, k3, yo, k3] 3 times, k7
R9: p1, [k2tog, k2, yo, k4] 3 times, p1, k6
R10: k1, [k2tog, k1, yo, k5] 3 times, k7
R11: p1, [k2tog, yo, k6] 3 times, p1, k6
R12: k1, [k1, yo, k5, ssk] 3 times, k1, C3F
R13: p1, [k2, yo, k4, ssk] 3 times, p1, k6
R14: k1, [k3, yo, k3, ssk] 3 times, k7
R15: p1, [k4, yo, k2, ssk] 3 times, p1, k6
R16: k1, [k5, yo, k1, ssk] 3 times, k7
R17: p1, [k6, yo, ssk] 3 times, p1, k6
R18: k1, [k2tog, k5, yo, k1] 3 times, k1, C3F

Repeat rows 7-18
Work rows 7-12 again

Thumb hole:
Move last 3 sts from the 3rd needle onto the working needle. (this splits the cable around the thumb hole.

1: k3, p1, [k2, yo, k4, ssk] 3 times, p1, k3
Turn work, as if knitting flat. Continuing working back & forth
2 (ws): p4, [p2tbl, p3, yo, p3] 3 times, p4
3 (rs): k3, p1, [k4, yo, k2, ssk] 3 times, p1, k3
4: p4, [p2tbl, p1, yo, p5] 3 times, p4
5: k3, p1 [k6, yo, ssk] 3 times, p1, k3
6: p4, [p1, yo, p5, p2tog] 3 times, p4
7: k3, p1, [k2tog, k4, yo, k2] 3 times, p1, k3
8: p4, [p3, yo, p3, p2tog] 3 times, p4
9: k3, p1, [k2tog, k2, yo, k4] 3 times, p1, k3
10: p4, [p5, yo, p1, p2tog] 3 times, p4
11: k3, p1, [k2tog, yo, k6] 3 times, p1, slip 3sts from 1st needle to working needle (6 sts on working needle), C3F

Work in the round:

1: Repeat rows 12-18 of the main eyelet stitch
2: purl
3: knit
4: purl

    Bind off all sts & weave in ends.  


Wednesday, October 13, 2010

leloGram Scarf


  This scarf was completely inspired by the yarn. I fell in love with it on a recent yarn excursion and *had* to have it. I think this pattern is perfect for it. I used size 17 needles so the fabric is soft and chunky but not too thick. leloGram is a perfect gift knit - quick & easy but absolutely beautiful.


 This pattern is #3 of the 14 free weekly patterns that I will be posting here on this blog. Check out this post to learn more.


leloGram Scarf

Yarn: Bernat Roving (Low Tide), bulky
Needles: Size 17 straight or circular
Gauge:   not important for this pattern .

ktbl:  knit through back loop
ptbl:  purl through back loop
RTK (right twist w/knit):  slip st to cable needle & hold in back of work,
                                              ktbl off left needle, k st off cable needle.   
RTP (right twist w/purl):  slip st to cable needle & hold in back of work,
                                              ktbl off left needle, p st off cable needle.   
LTK (left twist w/knit):  slip st to cable needle & hold in front of work,
                                              k st off left needle, ktbl  off cable needle.
LTP (left twist w/pulr):  slip st to cable needle & hold in front of work,
                                              p st off left needle, ktbl  off cable needle.
     
  Twist note:  These twists can be done without a cable needle. Here is a tutorial on cabling without a needle.

Seed St:
              Row 1: *k1, p1* to end
                Row 2: *p1, k1* to end

Cast-on 16 sts
Work 4 rows Seed St.

Row 5 (ws): k1, p1, p4, [k1, p1] twice, p4, k1, p1
Row 6 (rs): p1, k1, k4, [p1, k1] twice, k4, p1, k1
Row 7: repeat row 5
Row 8: p1, k1, k2, RTK, LTK, p1, k1, k2, RTK, p1, k1  
Row 9: k1, p1, k1, ptbl, p2, k1, p1, ptbl, p1, k1, ptbl, p2, k1, p1
Row 10: p1, k1, k1, RTP, k1, k1, LTK, k1, k1, RTP, k1, p1, k1
Row 11:   k1, p1, k1, p1, ptbl, p1, k1, ptbl, p2, k1, p1, ptbl, p1, k1, p1
Row 12: p1, k1, RTK, p1, k1, k2, LTK, RTK, [p1, k1] twice
Row 13: [k1, p1] 3 times, p4, [k1, p1] 3 times
Row 14: [p1, k1] 3 times, k4, [p1, k1] 3 times
Row 15: repeat row 13
Row 16: repeat row 14
Row 17: repeat row 13
Row 18: repeat row 14
Row 19: repeat row 13
Row 20: [p1, k1] twice, RTK, LTP, k2, p1, k1, RTK, p1, k1
Row 21: k1, p1, p1, ptbl, k1, p1, p2, ptbl, p1, p1, ptbl, [k1, p1] twice
Row 22: p1, k1, p1, RTK, k1, p1, LTK, k1, RTK, k1, p1, k1
Row 23: k1, p1, p2, ptbl, p1, p1, ptbl, k1, p1, p2, ptbl, p1, k1, p1
Row 24: p1, k1, RTK, k2, p1, k1, LTP, RTK, k2, p1, k1
Row 25: repeat row 5
Row 26: repeat row 6
Row 27: repeat row 5
Row 28: repeat row 6

Repeat Rows 5 -28 until scarf is desired length or you are close to running out of yarn.

Work 4 rows seed stitch
Bind off in pattern & weave in ends!

Enjoy!

Monday, October 11, 2010

14 Weeks of Free Patterns!

The Idea:    
     I may be absolutely crazy but I have decided to make a new j_erin knits design available every week through December. I am notorious for waiting until the last minute to finish gifts for my family and I have to believe that I am not the only one. I am always looking for things that can be knit up in weekend (or a few nights) so my focus is going to be on quick and easy knit gifts for the holidays.

The Specifics:
     I will be posting new patterns on this blog every Wednesday or Thursday, without fail! These patterns will also be added to the j_erin knits designer page on Ravelry. There will be patterns available for just about everything. I currently have plans for a few scarves & hats, leg warmers, a chunky blanket, and even a few toys.

Also:
     If things go well and people seem to enjoy my patterns then I will continue to post free knitting patterns weekly for a full year. That's 52 free patterns!! So if you like the patterns and want to see more then comment and let me know!

This week the pattern is a geometric chunky scarf that is yet to be named. It'll be up by Thursday evening at the latest.

Wednesday, October 6, 2010

Free Zaggity Hat Pattern


      I decided I wanted to make a less girly hat to balance the eyeleted Ava Lynne hat, so here it is... Zaggity! I worked this up with sock weight yarn (2 strands held together) and worsted weight. I was able to get the same gauge with both yarn weights and size 5 dpns. The zaggity stitch pattern is basically a purl zig-zag with slip stitch borders.   

Enjoy!  


Zaggity

Gauge: 5st/inch & 7rows/inch in Zaggity Stitch
Needles: Size 5 double pointed needles, or size needed to obtain gauge.
                                You may also be able to use a circular needle for larger sizes.
Yarn: Debbie Norville, Serenity Garden (2 strands yeld together) or Red Heart Eco Ways
                                Any yarn/needle combo to obtain gauge will work. J

Sizes:  NB (6M, 12M, 2-3, 4-6, 7-10)
Approx Finished Circ: 12” (14”, 15.5”, 17”, 19”, 21”)

Stitches:

M1: pick up the bar between stitches and knit into the back of it.

sl2 wyif: Slip the next 2 stitches, while holding the yarn in front of work. 
              <This creates a bar across the slipped stitches>

2x2 Rib St:
                Row 1: *k2, p2* to end
                Repeat row.

Cast-On:  60 (72, 76, 84, 96, 108)

Work 4 (5, 5, 6, 6, 7) rows in 2x2 Rib.

Set-Up Row: Knit, increasing 0 (0, 2, 0, 0, 0) stitches evenly across row, using m1 to create new stitches  (or whichever increase you prefer).

Zaggity Stitch:
Row 1: *k4, sl2 wyif, p4 (4, 5, 4, 4, 4), sl2 wyif* to end
Row 2: *k3, sl2 wyif, p4 (4, 5, 4, 4, 4), sl2 wyif, k1* to end
Row 3: *k2, sl2 wyif, p4 (4, 5, 4, 4, 4), sl2 wyif, k2* to end
Row 4: *k1, sl2 wyif, p4 (4, 5, 4, 4, 4), sl2 wyif, k3* to end
Row 5: *sl2 wyif, p4 (4, 5, 4, 4, 4), sl2 wyif, k4* to end
Row 6: Repeat Row 4
Row 7: Repeat Row 3
Row 8: Repeat Row 2
Row 9: Repeat Row 1
Row 10: *sl1 wyif, k4, sl2 wyif, p4 (4, 5, 4, 4, 4), sl1 wyif* to end
Row 11: * sl2 wyif, k4, sl2 wyif, p4 (4, 5, 4, 4, 4)* to end
Row 12: *p1, sl2 wyif, k4, sl2 wyif, p3 (3, 4, 3, 3, 3)* to end
Row 13: *p2, sl2 wyif, k4, sl2 wyif, p2 (2, 3, 2, 2, 2)* to end
Row 14: *p3, sl2 wyif, k4, sl2 wyif, p1 (1, 2, 1, 1, 1)* to end
Row 15: *p4 , sl2 wyif, k4, sl2 wyif, p0 (0, 1, 0, 0, 0)* to end
Sizes 12M ONLY:  *p5, sl2 wyif, k4, sl2 wyif* to end
Sizes 12M ONLY:  *p4, sl2 wyif, k4, sl2 wyif, p1* to end
Row 16: Repeat Row 14
Row 17: Repeat Row 13
Row 18: Repeat Row 12
Row 19: Repeat Row 11
Row 20: Repeat Row 10

                   Work Zaggity Pattern for 20 (24, 31, 35, 40, 47) total rows.

Decreases:

Newborn:
                       Row 1: *k1, k2tog, k1, sl2 wyif, p4, sl2 wyif* to end     (55 sts)
                       Row 2: *k2, sl 2 wyif, p4, sl 2 wyif, k1* to end
                       Row 3: *k1, sl2 wyif, p4, sl2 wyif, k2*
                       Row 4: *sl2 wyif, p1, p2tog, p1, sl2 wyif, k3*    (50 sts)
                       Row 5: *k1, sl2 wyif, p1, sl2 wyif, k4
                       Row 6: *k2, sl3 wyif, k5

6M:
                       Row 1: *sl2 wyif, p4, sl2 wyif, k1, k2tog, k1* to end   (66 sts)
                       Row 2: *k1, sl2 wyif, p4, sl2 wyif, k2* to end
                       Row 3: *k2, sl2 wyif, p4, sl2 wyif, k1* to end
                       Row 4: *k3, sl2 wyif, p1, p2tog, p1, sl2 wyif* to end    (60 sts)
                       Row 5: *k4, sl2 wyif, p1, sl2 wyif, k1*
                       Row 6: *k5, sl3 wyif, k2*

12M:
                       Row 1: *sl1 wyif, k1, k2tog, k1, sl2 wyif, p5, sl1 wyif* to end  (72 sts)
                       Row 2: *sl2 wyif, k3, sl2 wyif, p5* to end
                       Row 3: *p1, sl2 wyif, k3, sl2 wyif, p4* to end
                       Row 4: *p2, sl2 wyif, k3, sl2 wyif, p1, p2tog* to end    (66 sts)
                       Row 5: *p3, sl2 wyif, k3, sl2 wyif, p1* to end
                       Row 6: *p2 tog, sl2 wyif, k5, sl2 wyif* to end   (60 sts)
                       Row 7: *sl2 wyif, k7, sl1 wyif* to end

2-3Y:
                       Row 1: *p3, sl2 wyif, k1, k2tog, k1, sl2 wyif, p1* to end   (77 sts)
                       Row 2: *p2, sl2 wyif, k3, sl2 wyif, p2* to end
                       Row 3: *p1, sl2 wyif, k3, sl2 wyif, p3* to end
                       Row 4: *sl2, wyif, k3, sl2 wyif, p1, p2tog, p1* to end    (70 sts)
                       Row 5: *sl1 wyif, k5, sl2 wyif, p1, sl1 wyif* to end
                       Row 6: *k7, sl3 wyif* to end

4-6Y:
                       Row 1: *k1, k2tog, k1, sl2 wyif, p4, sl2 wyif* to end     (88 sts)
                       Row 2: *k2, sl 2 wyif, p4, sl 2 wyif, k1* to end
                        Row 3: *k1, sl2 wyif, p4, sl2 wyif, k2*
                        Row 4: *sl2 wyif, p1, p2tog, p1, sl2 wyif, k3*    (80 sts)
                        Row 5: *k1, sl2 wyif, p1, sl2 wyif, k4
                        Row 6: *k2, sl3 wyif, k5

7-11Y:
                         Row 1: *k2tog, k1, sl2 wyif, p4, sl2 wyif, k1* to end     (99 sts)
                         Row 2: *k3, sl2 wyif, p4, sl2 wyif* to end
                         Row 3: *sl1 wyif, k3, sl2 wyif, p4, sl1 wyif* to end
                         Row 4: *sl2 wyif, k3, sl2 wyif, p1, p2tog, p1* to end    (90 sts)
                         Row 5: *sl1 wyif, k5, sl2 wyif, p1, sl1 wyif* to end
                         Row 6: *k7, sl3 wyif* to end

ALL SIZES:
                                Row 1: knit all sts
                                Row 2: *k8, k2tog* to end
                                Row 3: *k7, k2 tog* to end
                                Row 4: *k6, k2tog* to end
                                Row 5: *k5, k2tog* to end
                                Row 6: *k4, k2tog* to end
                                Row 7: *k3, k2tog* to end
                                Row 8: *k2, k2tog* to end
                                Row 9: *k1, k2tog* to end
                                Row 10: *k2tog* to end       5 (6, 6, 7, 8, 9) sts remaining

Cut yarn, pull through live stitches to close. Weave in ends. :D


Friday, October 1, 2010

Upcoming Pattern Preview...

     Before I get to the upcoming pattern, I just want to say that I am beyond excited that people seem to be liking my first pattern, Ava Lynne. My goal is to try to get at least 2 free patterns up on this blog per month. I believe that, at its core, knitting is a community activity. We are taught to knit by friends and family; we share technique and patterns with our knitting groups (virtually & in person). Websites like Ravelry and Knitty have both contributed to creating an online community of knitters (the ultimate knitting group). These free patterns are my meager way of trying to give back to this community that I have been in a lurking in for years.

     Whoa! Enough of that. On to pattern details. Soon I will be putting up a pattern for another hat, Ziggity (pictured below). This hat is shown in newborn but I plan to create the pattern for sizes up to older children (preteen). The stitch pattern on this hat is a combination of zig-zagging purls & slipped stitches. I am a big fan and I hope you all are too. ;)


      I am also working on an adult version of Ava Lynne & a scarf worked in an elongated adaptation of the Ava Lynne Eyelet. Keep checking back here for details on upcoming patterns or, for you Ravelers, you can watch the j_erin knits designs page on Ravelry.

Wednesday, September 29, 2010

Ava Lynne Baby Hat

A few weeks ago my cousin gave birth to her third child, a girl, named Ava Lynne. She is a beautiful little girl and as soon as I saw a picture of her I was inspired to create my first baby hat pattern. As you can see, I even named it after her. This hat has a fairly simple eyelet pattern with decreases that are worked in so the little squiggles go up to the crown of the hat.

I have included sizing for Preemie up to 4 years old (newborn size pictured below), but I haven't tested all the sizes yet so if you see an error let me know. 

Enjoy!


Ava Lynne

Worsted Weight Yarn – I used Lion Brand Vanna's Choice.
Size 5 DPNs (or size needed to obtain gauge).
Gauge:  5 sts/inch in Eyelet Stitch

Sizes: Preemie (Newborn, 3-6 Months, 6-12 Months, 2 yrs, 3yrs, 4 yrs)
Approx. Finished Hat Circumferences: 11” (12”, 13”, 14”, 16”, 17", 18”)
Pattern Repeats:  9(10, 11, 12, 13, 14, 16)

Seed St:
Row 1: *K1, P1* repeat to end
Row 2: *P1, K1* repeat to end

Eyelet Stitch:
Row 1: *yo, k4, k2tog* to end
Row 2: *k1, yo, k3, k2tog* to end
Row 3: *k2, yo, k2, k2tog* to end
Row 4: *k3, yo, k1, k2tog* to end
Row 5: *k4, yo, k2tog* to end
Row 6: *ssk, k4, yo* to end
Row 7: *ssk, k3, yo, k1* to end
Row 8: *ssk, k2, yo, k2* to end
Row 9: *ssk, k1, yo, k3* to end
Row 10: *ssk, yo, k4* to end

Cast-On: 54 (60, 66, 72, 78, 84, 96) & join to work in the round.

Work Seed Stitch for 4 (4, 4, 4, 6, 6, 6) rows.

Work in Eyelet stitch to 2.5" (3", 3.5", 4.5", 5", 5.25", 5.5”) from cast-on edge.

Decrease:
Work next row in the Eyelet St, but skip the yarn-overs (yo).
Follow chart below to find starting point on 1st Decreased Eyelet.
 *If you decreased on row 3 of the eyelet, then start on row 4 of the Dec Eyelet.*

DecRow
Start DecEyelets
1
2
2
3
3
4
4, 5, 6
5
7
6
8
7
9
8
10
1

                Work 3 Rows of 1st Decreased Eyelet.
                                1st Decreased Eyelet:
Row 1: *yo, k3, k2tog* to end
Row 2: *k1, yo, k2, k2tog* to end
Row 3: *k2, yo, k1, k2tog* to end
Row 4: *k3, yo, k2tog* to end
Row 5: *ssk, k3, yo* to end.
Row 6: *ssk, k2, yo, k1* to end.
Row 7: *ssk, k1, yo, k2* to end.
Row 8: *ssk, yo, k3* to end

                Work another decrease row – next row in First Decrease Eyelet St, skipping the yarn overs (yo).
                Use chart below to find place in 2nd Dec Eyelet

DecRow
Start DecEyelets
1
2
2
3
3, 4, 5
4
6
5
7
6
8
1

Work 1 row of 2nd Decreased Eyelet.
2nd Decreased Eyelet:
Row 1: *yo, k2, k2tog* to end
Row 2: *k1, yo, k1, k2tog* to end
Row 3: *k2, yo, k2tog* to end
Row 4: *ssk, k2, yo* to end
Row 5: *ssk, k1, yo, k1* to end
Row 6: *ssk, yo, k2* to end

Work Remaining Decrease rows as follows:
                                If you left off on Rows 1-3 of 2nd Dec Eyelet, then:
Row 1: *k2, k2tog* to end
Row 2: *K1, k2tog* to end
Row 3: *k2tog* to end

<2yr, 3yr, 4yr only>
Row 4:
   Size 2y: *k2tog* to last st, k1
   Size 3y: *k2tog* to end
   Size 4y: *k2tog, k1, k2tog* to end


                                If you left off on Rows 4-6 of 2nd Dec Eyelet, then:
Row 1: *ssk, k2* to end
Row 2: *ssk, k1* to end
Row 3: *k2tog* to end

<2yr, 3yr, 4yr only>
Row 4:
   Size 2y: *k2tog* to last st, k1
   Size 3y: *k2tog* to end
   Size 4y: *k2tog, k1, k2tog* to end


                Cut yarn and pull through live stitches to close. Weave in ends. :D